自從開始玩 rpi2 之後,一直沒真正做什麼有用的東西出來。都是 demo code 裝一裝,跑一跑之後就收起來了。 直到最近發現了 Magic Mirror(Smart Mirror),而且剛好手上有不少沒在使用的 LCD 面板,所以就興起了做一個來試試的念頭。
製作一個 Magic Mirror 需要下列材料(附上採買時的價格)
可以從舊的筆電上拆下來,或是買舊的顯示器來拆,或是露天上有些賣家有在賣面板的。買的時候要注意,一定要是 eDP 2/3 lanes(30 pins) 的,因為市面上找不到 eDP 4 lanes(40 pins) 的 control board。至於 LVDS 接頭的,應該遇不太到,這是早期的介面,不過如果面板是這種接頭的也可以。
面板後面會有面板的 Model No,像我的就是 B125HAN02.2,可以到 Panelook 找到這塊面板的資料,確定 Signal Interface 是 eDP 30 pins。
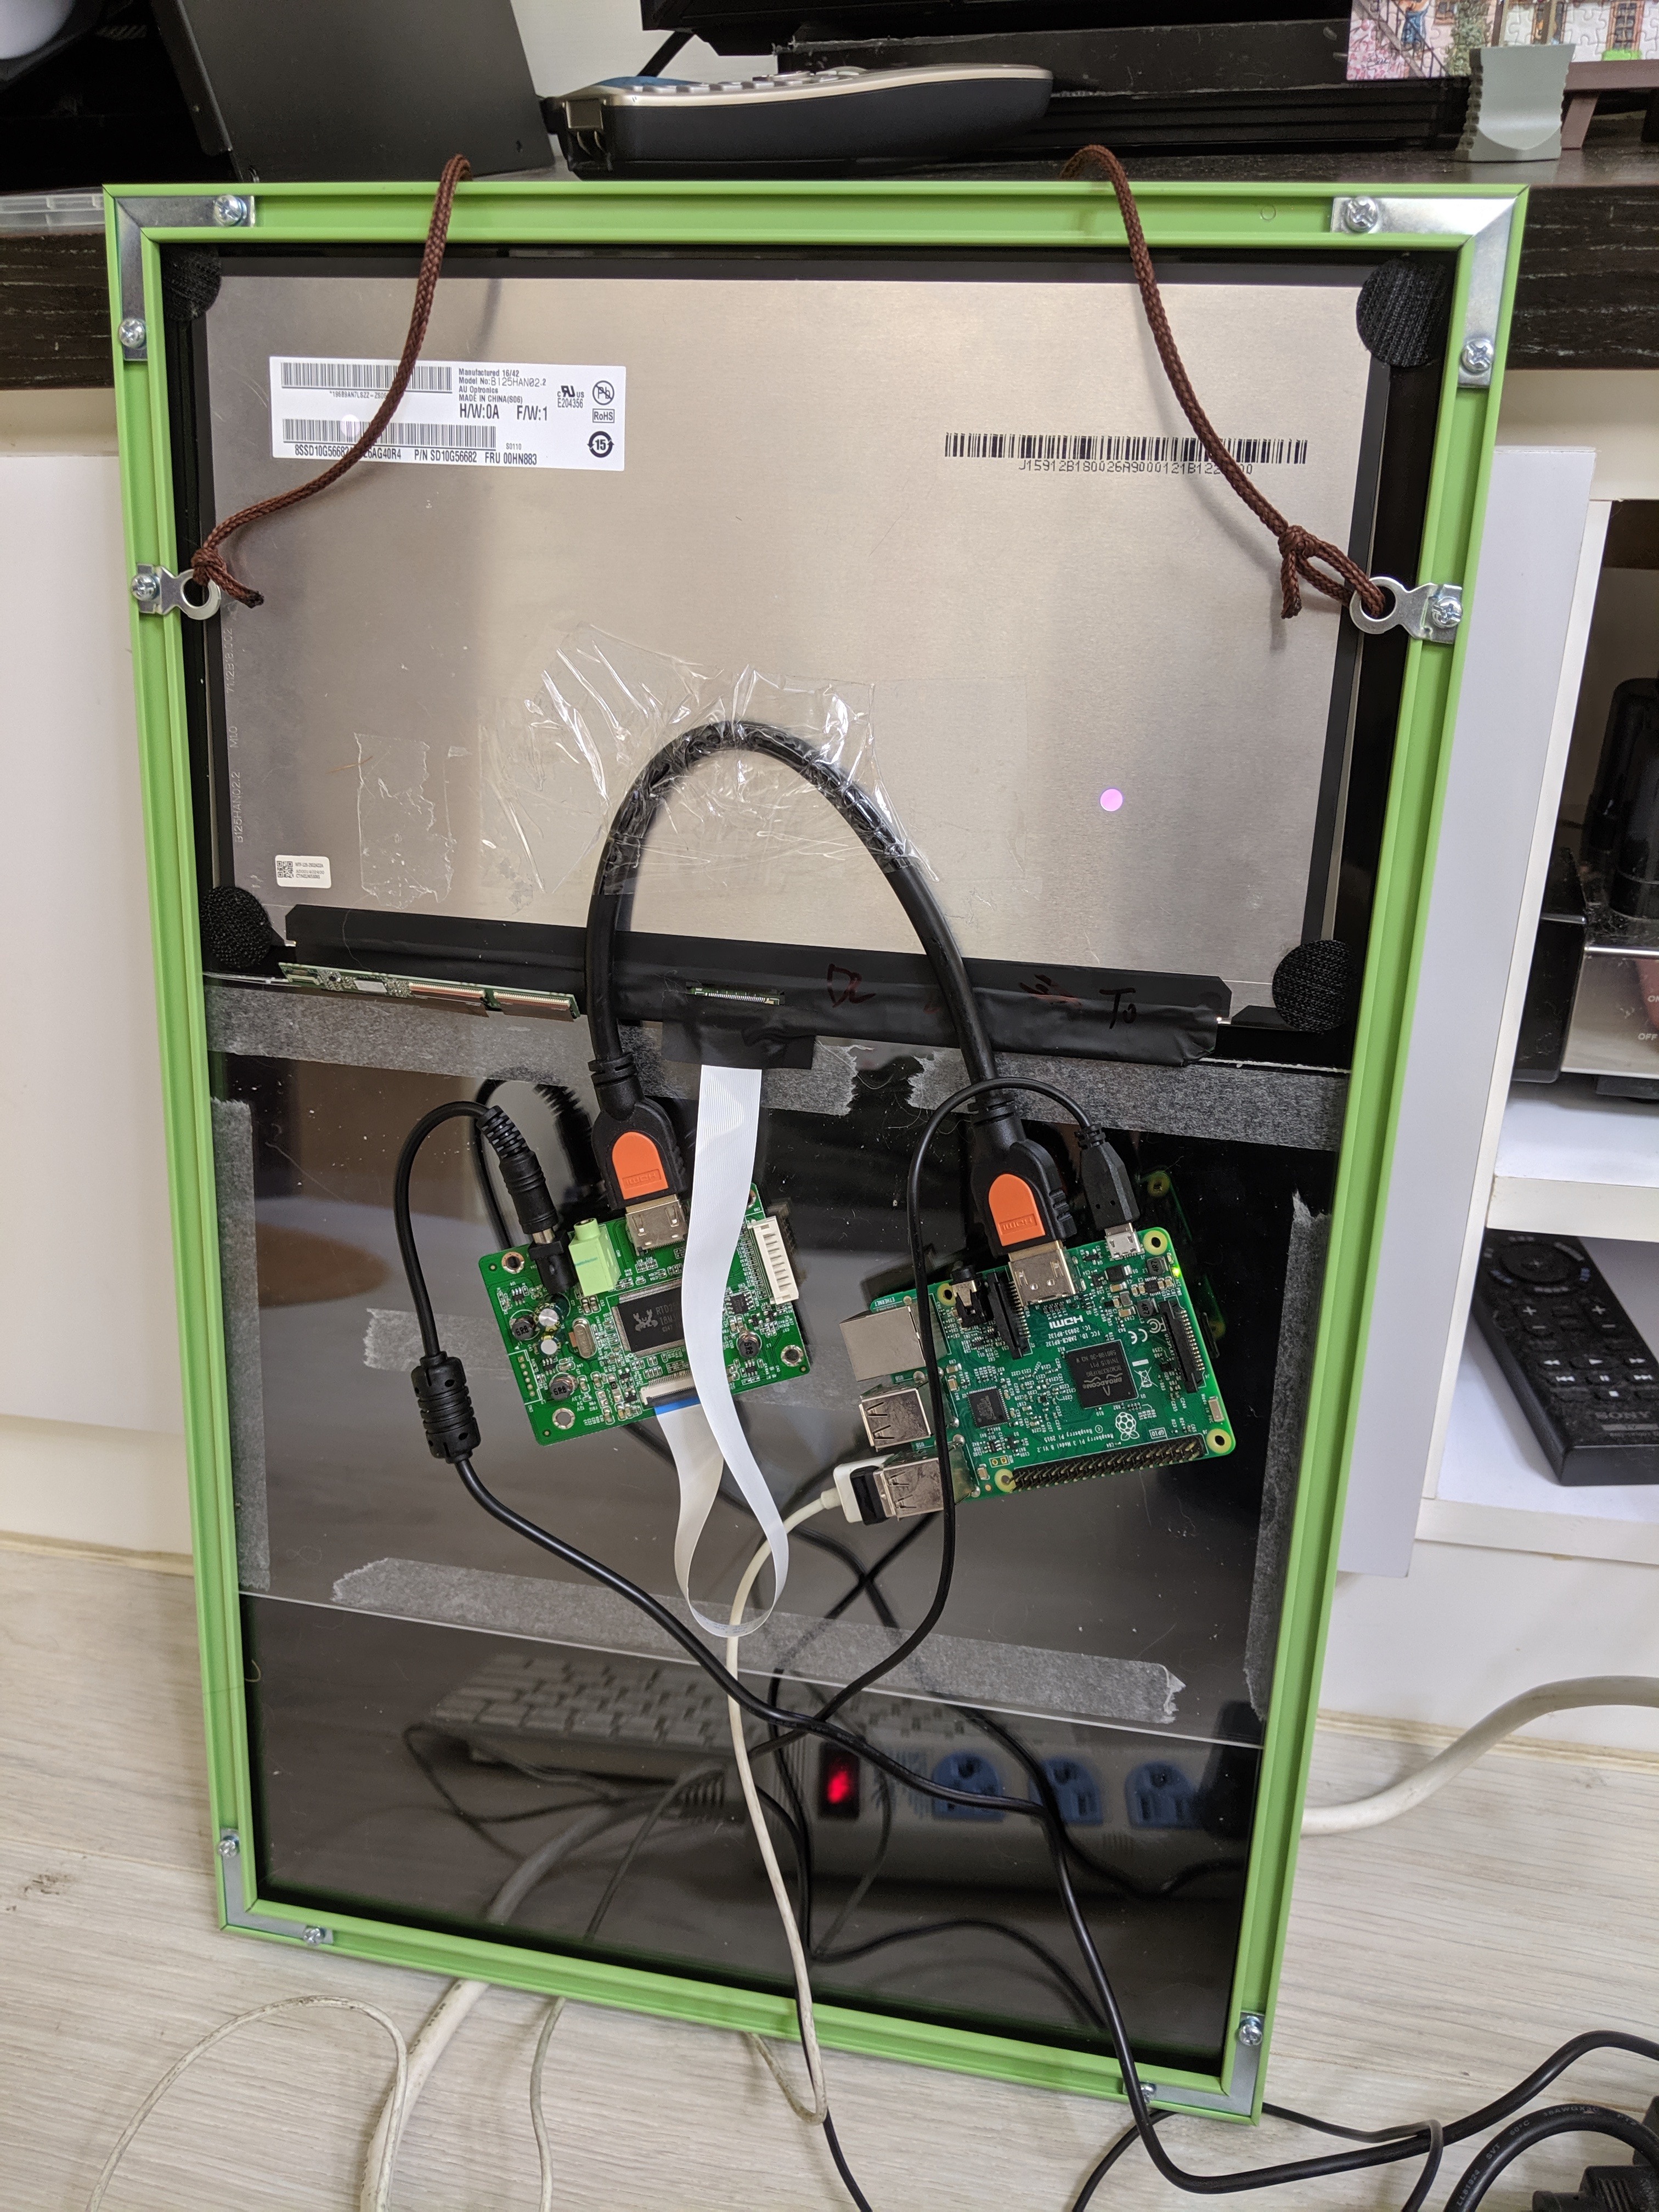
LCD 面板沒辦法直接接到 rpi 上,得要透過 HDMI 介面,所以我們需要一塊 eDP 控制板來連接,並生出 HDMI 介面。由於 eDP 並沒有萬用的控制板(LVDS 介面的只要去露天隨便找一塊就行),所以你得要先記下面板的 Model No. 然後到露天找能幫你燒 eDP firmware 的控制板賣家(用 "eDP 驅動板" 查),然後買一塊與你面板能搭配的控制板。
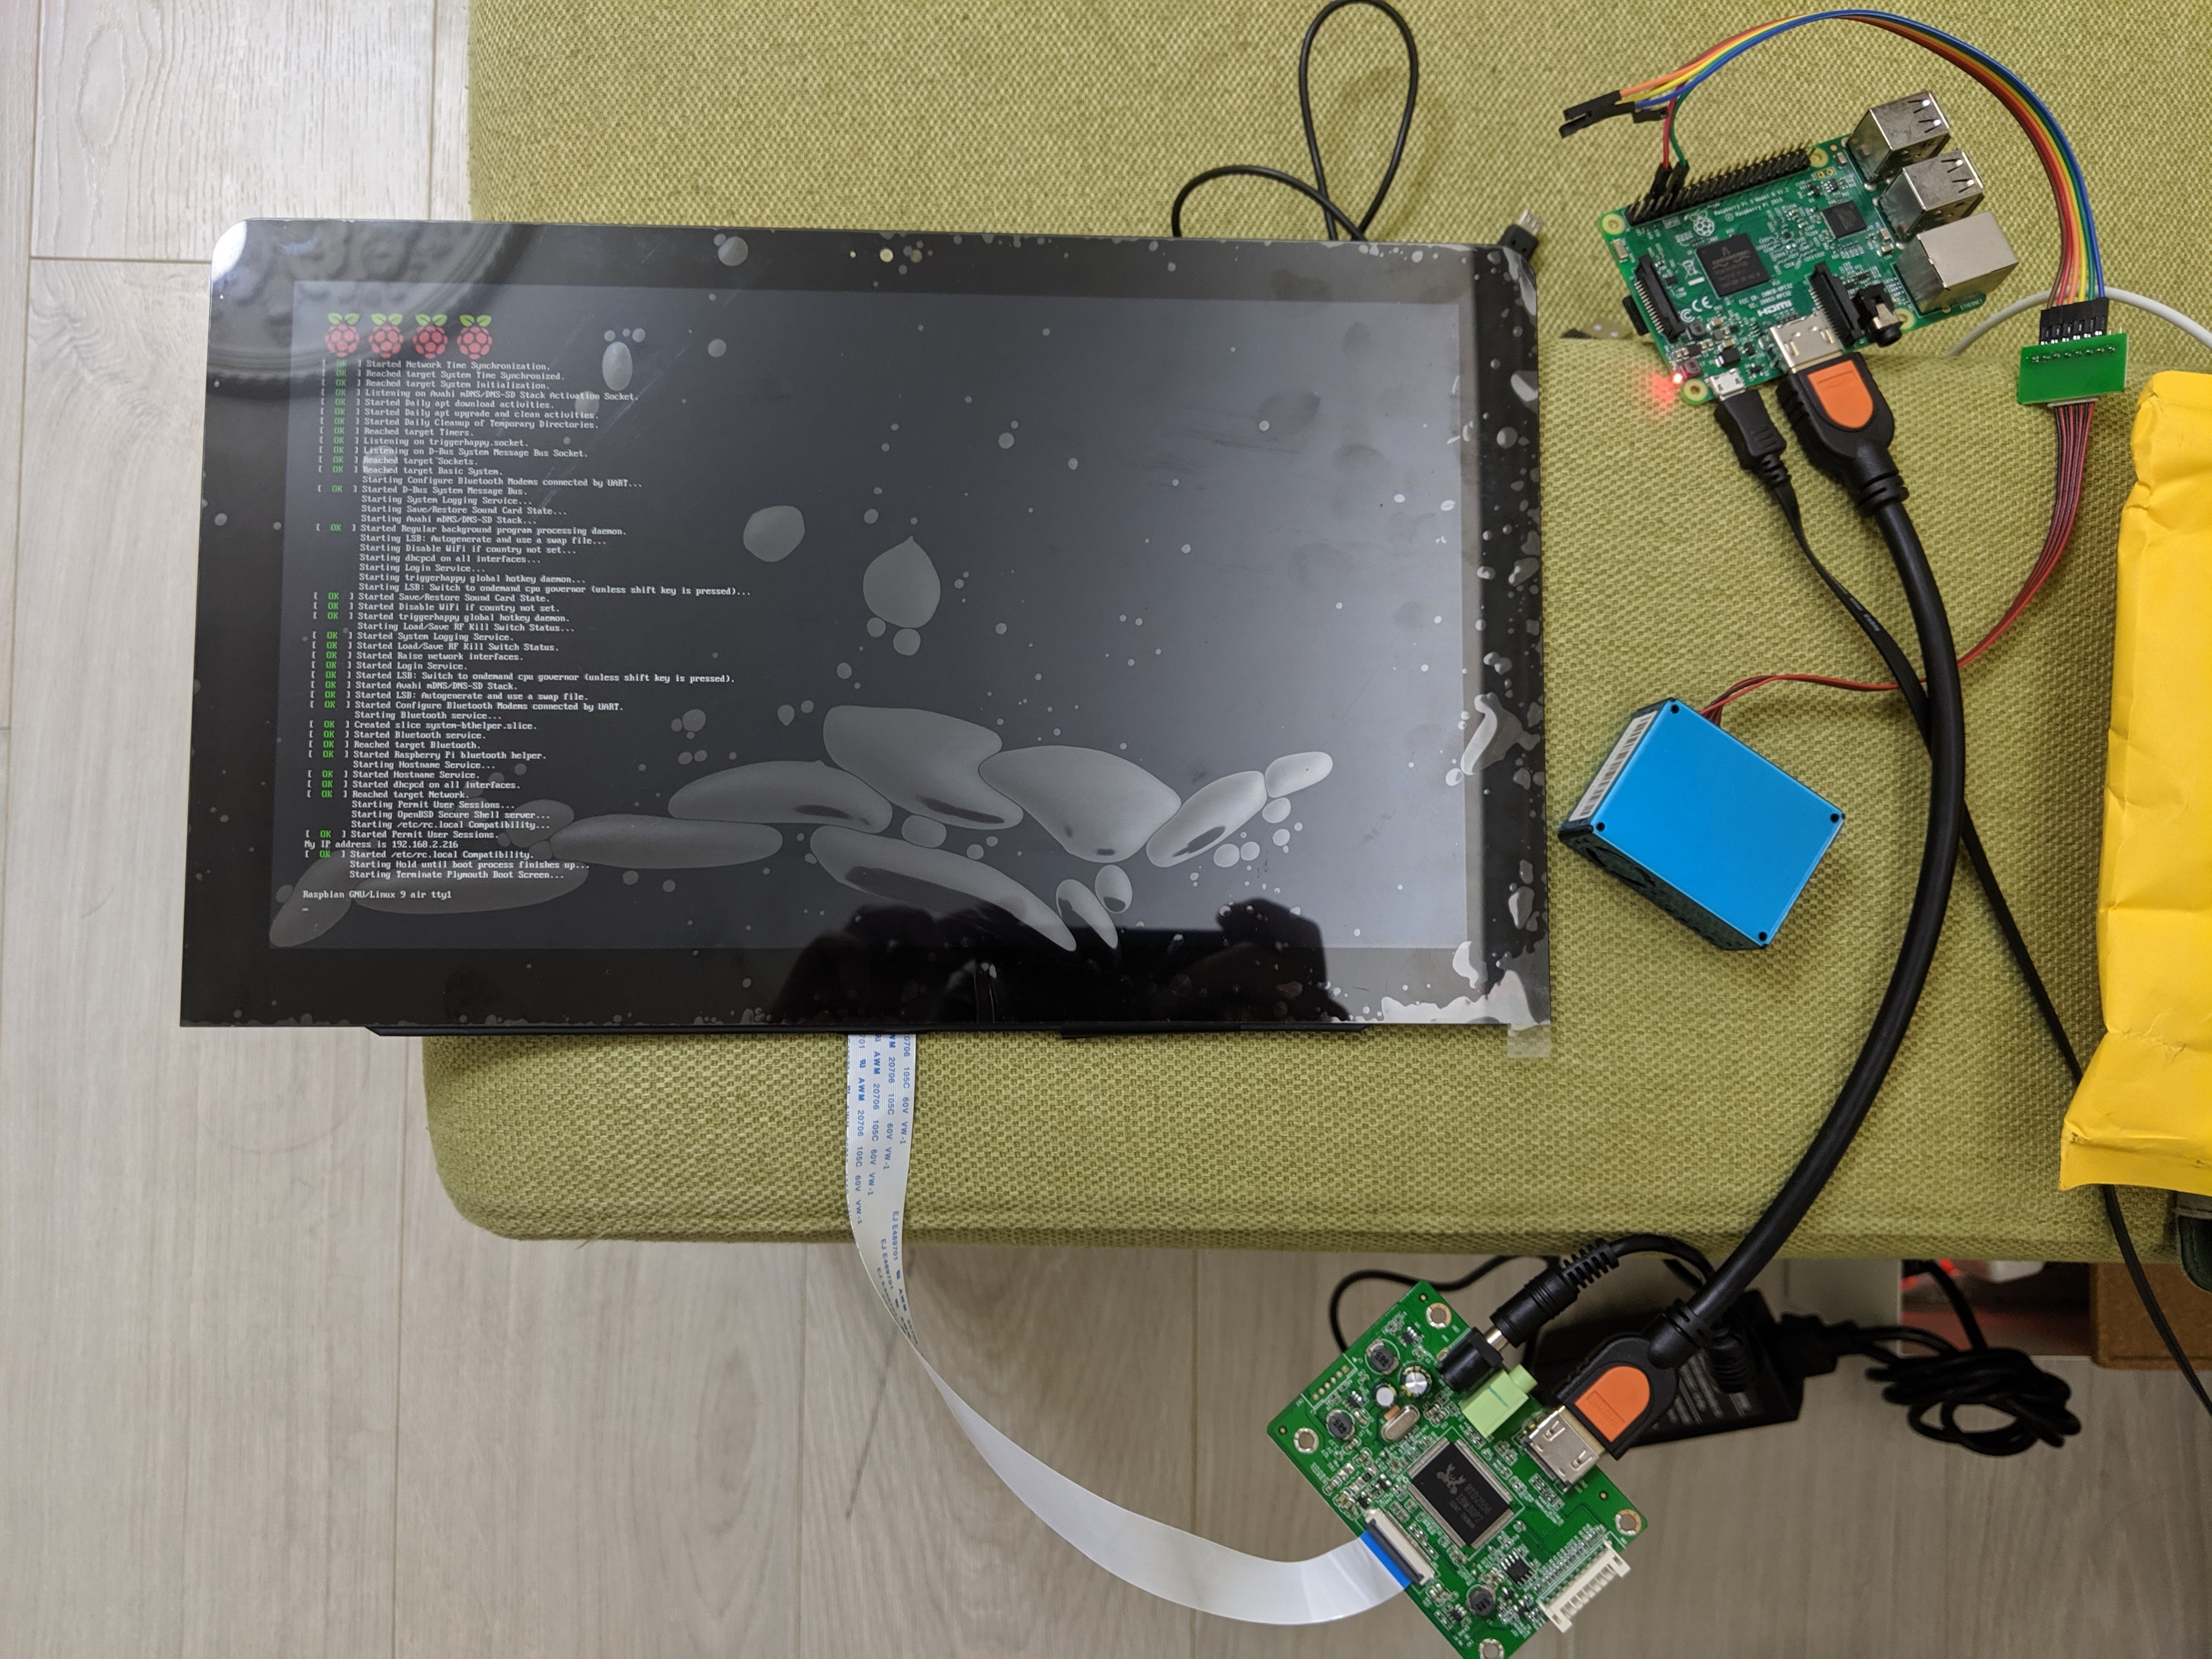
Pi 板大家都有,就不再贅述了。這邊要注意的是,必需使用 desktop 版本的 image,因為 Magic Mirror 需要使用到 Desktop 來畫畫面。如果是裝 Lite 版本的,就得要自己補齊缺少的套件。 上面的材料都有了,就可以先把線接起來看看囉。
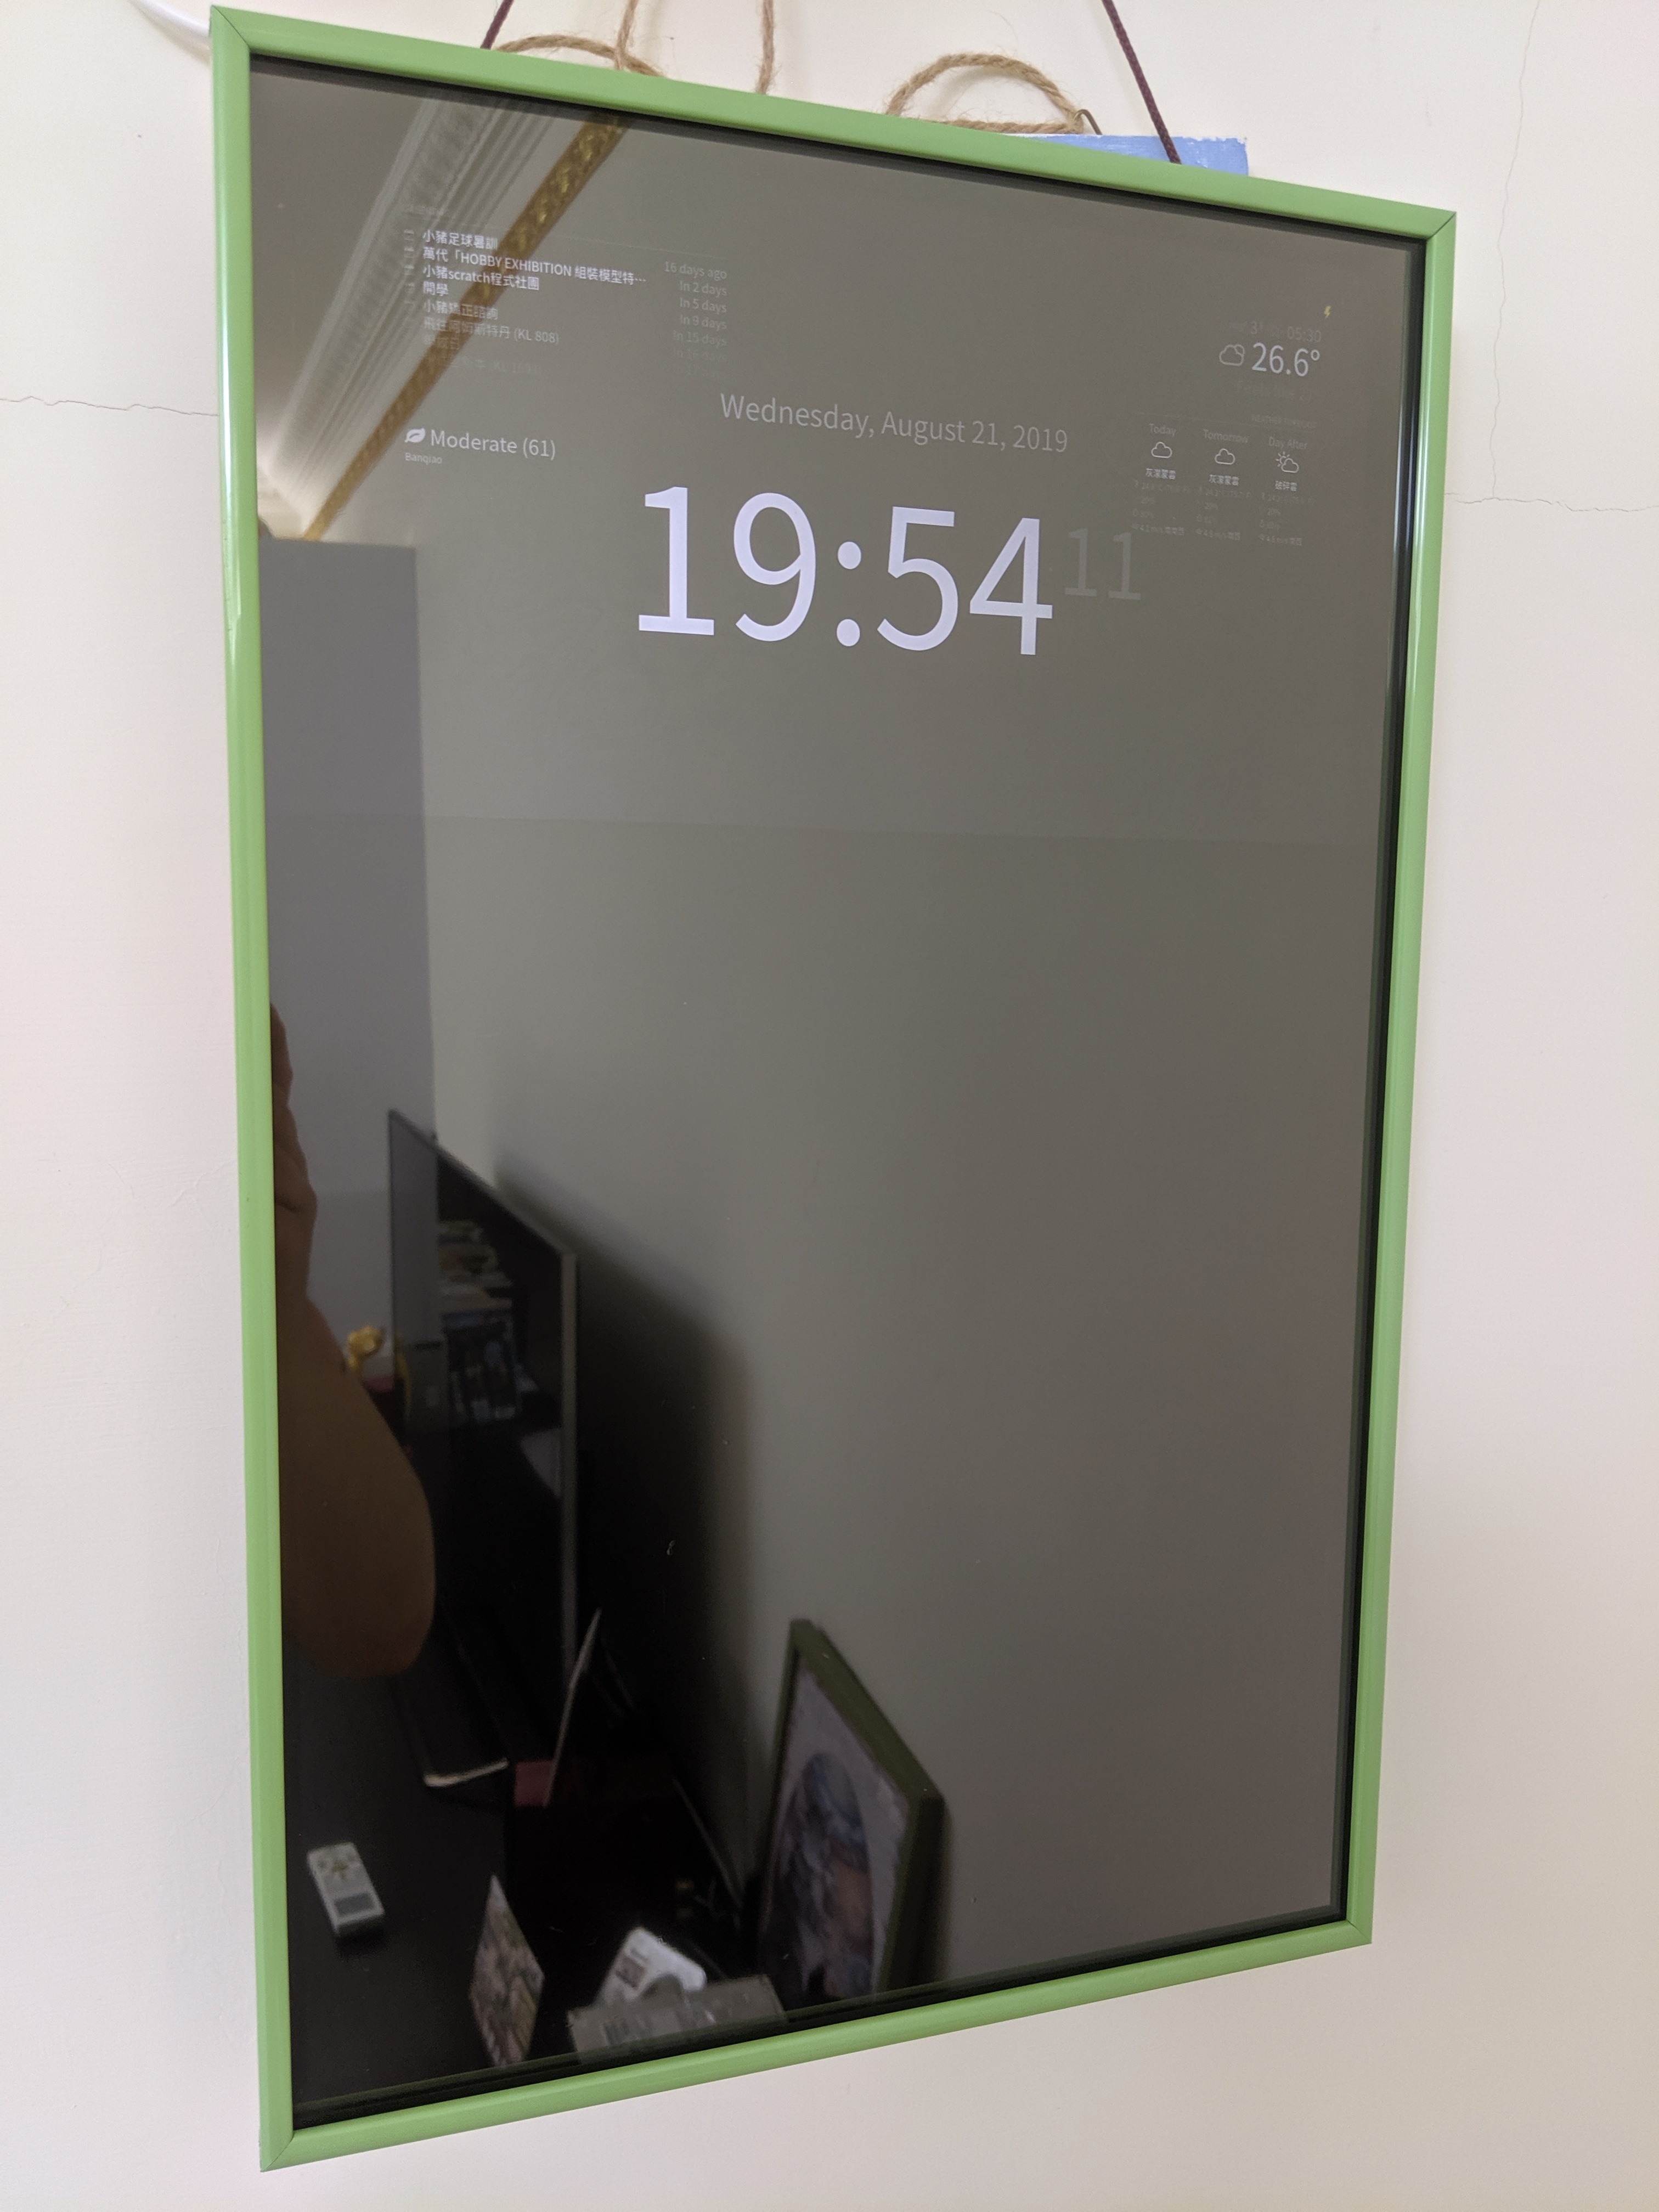
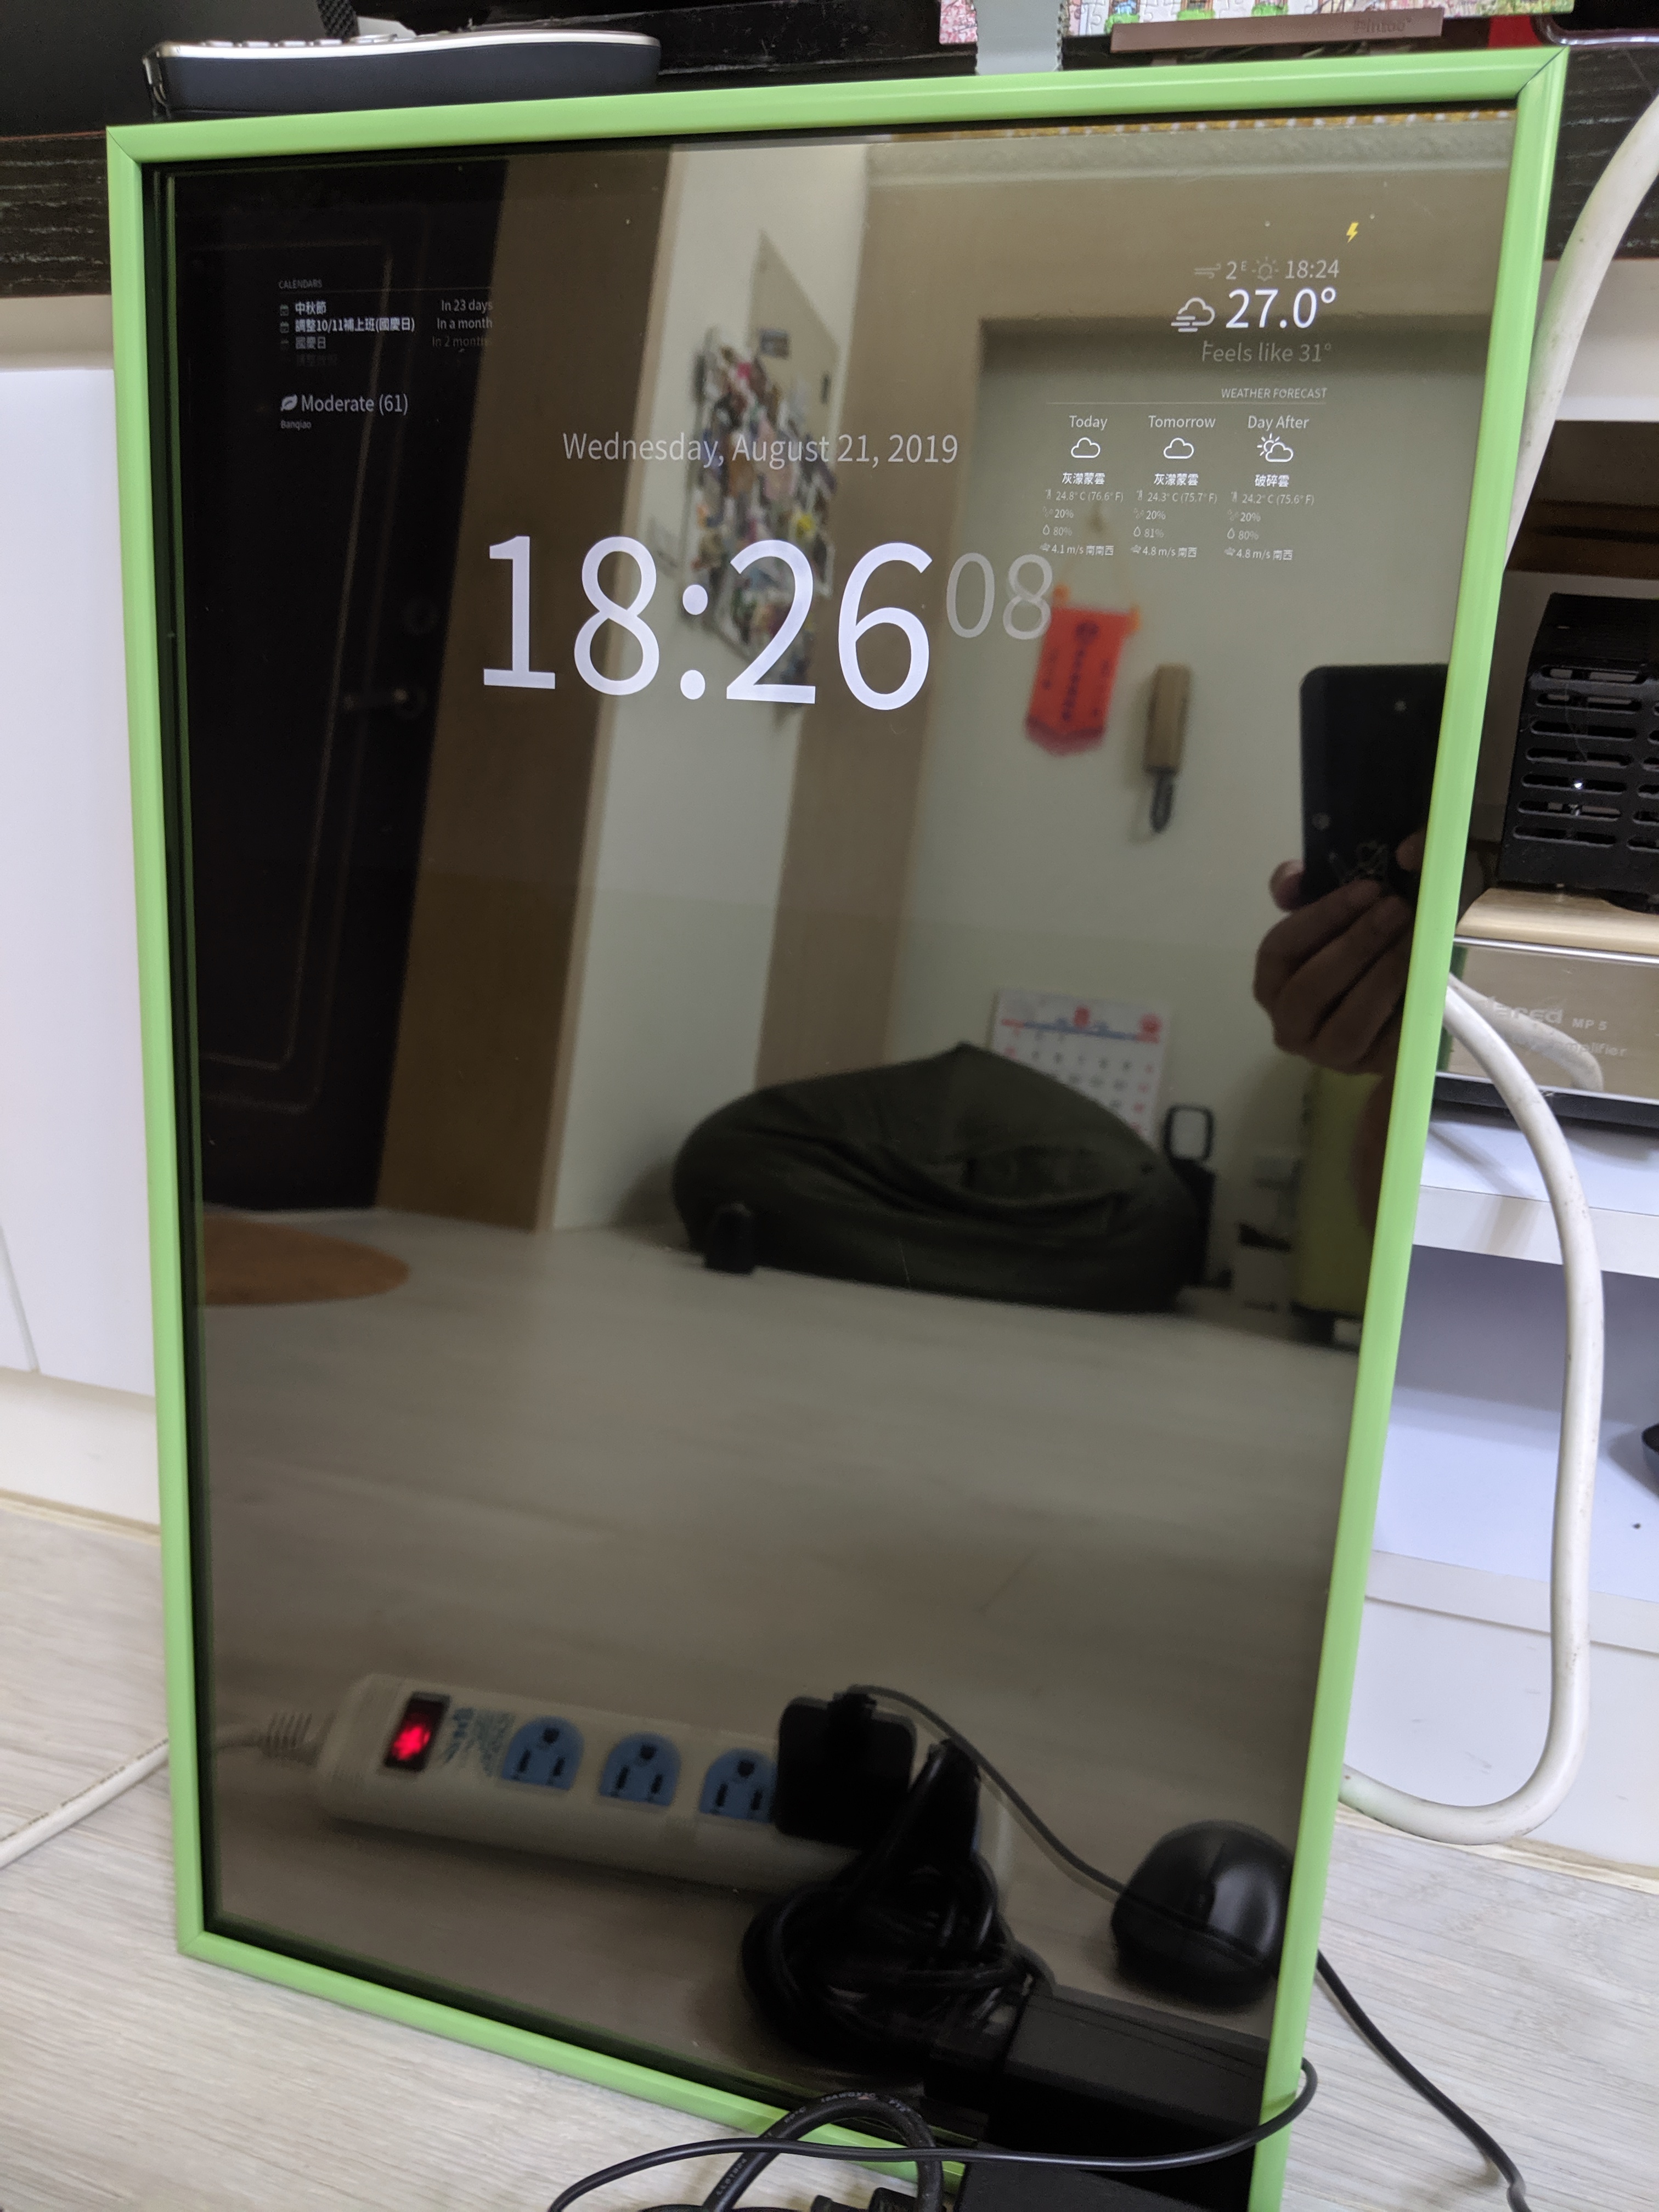
不知道網路上那些人去哪生的雙面鏡,我去我家附近的玻璃店請他切一塊我想要的大小,然後使用半透明跟不透明的玻璃紙來達成雙面鏡的功能。
玻璃的大小為 30cm X 50cm X 5mm 要價 $150,比我想像中的還要便宜。
我買了兩種不同的玻璃紙,一種是 40% 透光半黑的,另一種是 100% 不透光的(其實還是有一點點透)。這次不是露天上買的了,是 PChome :p
40% 透光的紙主要是遮蓋面板的邊緣,避免透過玻璃直接看到 LCD 面板,這樣看起來很突兀。用 40% 透光的紙先貼一層在整個玻璃上,這樣放 LCD 上去,痕跡就不這麼明顯了。(還是看的到一條線啦,可以試試透光率更低的紙。不過透光率低,也就表示 LCD 上顯示的字越看不到。)
網路上大家都是用木框自己組,但是我手上沒有木材,也不想做很粗的外框,所以就在露天上找到可以訂做鋁框的店家,30cm X 50cm $250 品質不錯,轉角都有補強,掛這麼重的玻璃還是很穩固。而且他還有附透明壓克力板,把它裁切出 LCD 大小的空間,剛好可以從下面撐住 LCD,實在是非常剛好。
首先,先處理玻璃的部分。先把玻璃整個噴溼,然後撕下 40% 玻璃紙背膠時也邊撕邊噴溼,小心的把整塊玻璃貼上 40% 玻璃紙,並用刮刀把水給刮出去。
然後再貼不透明的玻璃紙,不透光的玻璃紙切掉 LCD 面板佔用的部分之後貼上去,這樣鏡子就完成了。
把水份刮乾,確定玻璃紙黏好後,就可以裝進框裡(沒有貼玻璃紙的朝外)。然後拿出框附的透明壓克力板,切下 LCD 顯示的大小,並把切下來的部分用雙面膠黏回去補強(或是能放在玻璃下半部分支撐 LCD 的支架),然後也放進框裡。這時框裡會有黏好玻璃紙的玻璃、LCD 下方的支撐架、及 LCD 面板。
接著再將 Pi 板(已裝好 Desktop 版 image)及 LCD 控制板接上,並黏在壓克力板(支撐架)上,然後就可以開機試試了。 因為 Pi 板跟 LCD 控制板都需要電源,為了走線簡潔一點,我黏了個延長線在後面。這個延長線插上 USB 插頭,跟給 LCD 控制板供電,這樣只需要拉出來一個插頭就可以使用。
直接使用現成的 Magic Mirror,安裝超簡易,只需要執行下面指令即可。
1
bash -c "$(curl -sL https://raw.githubusercontent.com/MichMich/MagicMirror/master/installers/raspberry.sh)"
雖然執行 Magic Mirror 安裝程式時,就有加入自動啟動的設定,但是使用 pm2 自動啟動是需要 root 權限的,所以前面的設定並不會自動讓 pm2 跑起來,也不會執行 Magic Mirror。下面的 sudo 會將 pm2 加入 systemd 讓它開機之後自動執行,然後確定 pm2 list 裡有 MagicMirror 然後 save 保存住狀態。這樣重開機才會完整的重啟。
1
2
3sudo pm2 startup systemd -u pi --hp /home/pi
pm2 list
pm2 save
Magic Mirror 的設定檔在 MagicMirror/config/config.js,
原本設定是美國的節日,將 calendar 的 url 改成台灣節日。
1
"webcal://p44-calendars.icloud.com/published/2/OuWr4vvGTAk6NFghJ3slQyh-zgesLNYCFmqdG9d EmKzrGVLNOVdFzyDH--YF4MZpJBZyUEb3U0Nevd1EsU_ZI-aeIaQJTTLqnw6AHOZVKdo"
1
2
3
4
5
6
7
8
9
10calendars: [
{
symbol: "calendar-check",
url: "webcal://p44-calendars.icloud.com/published/2/OuWr4vvGTAk6NFghJ3slQyh-zgesLNYCFmqdG9d EmKzrGVLNOVdFzyDH--YF4MZpJBZyUEb3U0Nevd1EsU_ZI-aeIaQJTTLqnw6AHOZVKdo"
},
{
symbol: "Family Calendar",
url: "非公開網址(iCal 格式)"
}
]
原本的時間太小,所以透過 CSS 將它放大,但是整個日期跟時間一起放大會蓋掉左右兩邊的東西,所以另外再將日期縮小。
1
2
3
4
5
6
7.clock {
transform: scale(5.0);
}
.clock .date {
font-size: 10px;
}
自從開始玩 rpi2 之後,一直沒真正做什麼有用的東西出來。都是 demo code 裝一裝,跑一跑之後就收起來了。 直到最近發現了 Magic Mirror(Smart Mi]]>
下面就把去年的文章重整一下 有興趣的照著作 應該不會有問題
Ubuntu Bionic 已經 release 了 所以 docker 改用 18.04
1
docker run -it -v /home:/home ubuntu:18.04
以下指令沒特別說明的話 都在 docker 裡面執行
1
2
3
4dpkg --add-architecture i386
apt update
apt install software-properties-common
apt install --install-recommends wine64
建立帳號 steam 帳號 因為有 -v /home:/home 所以這個 steam 帳號會出現在 host 的 /home 下
1
adduser steam
安裝 x86 版的 steamcmd 我是直接放在 steam 的 home 目錄下 解開後會有不少檔案
1
2
3
4
5apt install wget unzip
su steam
cd ~
wget https://steamcdn-a.akamaihd.net/client/installer/steamcmd.zip
unzip steamcmd.zip
使用 steamcmd 下載遊戲 約有 16GB
1
wine steamcmd +login anonymous +force_install_dir c:\\conanKFC +app_update 443030 +quit
下載完後 可以先啟動 server 讓他把設定檔產生出來
1
wine ~/.wine/drive_c/conankfc/ConanSandboxServer.exe
預設的設定檔在這邊
1
/home/steam/.wine/drive_c/conankfc/ConanSandbox/Config/
主要的幾個檔案跟可修改的內容是 其他遊戲中的參數要用生出來的設定檔來改
生出來的設定檔會出現在這裡
1
/home/steam/.wine/drive_c/conankfc/ConanSandbox/Saved/Config/WindowsServer/
如果 server 能正確啟動(會吐出非常多的訊息) 那 docker 的部分跟整個 server 的架設就差不多了
Ctrl+C 結束 server 之後再按 Ctrl+D 離開 docker 離開之前 要把帳號後的 image id 給記下來
1
2steam@f3becc6a2a46:~$ exit
root@f3becc6a2a46:~# exit1
acelan@acelan ~/docker/conan % docker commit -m "initial Conan Exiles server" -a "initial Conan Exiles server" f3becc6a2a46 conan_exiles
之後要啟動 Conan Exiles server 需要執行下面指令 基本上這個指令只需要執行一次 以後我們都用 start/stop 來開關這個 server
1
2
3docker run -d --name conan_server -it -v /home:/home \
-p 7777:7777/udp -p 27015:27015/udp \
conan_exiles wine /home/steam/.wine/drive_c/conankfc/ConanSandboxServer.exe
要停掉 server 這樣做
1
docker stop conan_server
啟動 server 這樣做
1
docker start conan_server
當 Conan Exiles 有更新時 我們得要進入 docker 中來 update 檔案
1
2
3docker exec -i -t conan_server /bin/bash
su steam ; cd
wine ./steamcmd.exe +login anonymous +force_install_dir c:\\conanKFC +app_update 443030 +quit
想要看 server logs 的 可以用這個指令
1
docker logs conan_server
簡介 eBPF 能做什麼
目前 eBPF 支援以下幾種類型的程式,但是這邊只研究 kprobe 跟 tracepoint。
1
2
3
4
5
6
7
8
9
10bool is_socket = strncmp(event, "socket", 6) == 0; // a network packet filter
bool is_kprobe = strncmp(event, "kprobe/", 7) == 0; // determine whether a kprobe should fire or not
bool is_kretprobe = strncmp(event, "kretprobe/", 10) == 0; // determine whether a kretprobe should fire or not
bool is_tracepoint = strncmp(event, "tracepoint/", 11) == 0; // determine whether a tracepoint should fire or not
bool is_xdp = strncmp(event, "xdp", 3) == 0; // a network packet filter run from the device-driver receive path
bool is_perf_event = strncmp(event, "perf_event", 10) == 0; // determine whether a perf event handler should fire or not
bool is_cgroup_skb = strncmp(event, "cgroup/skb", 10) == 0; // a network packet filter for control groups
bool is_cgroup_sk = strncmp(event, "cgroup/sock", 11) == 0; // a network packet filter for control groups that is allowed to modify socket options
bool is_sockops = strncmp(event, "sockops", 7) == 0; // a program for setting socket parameters
bool is_sk_skb = strncmp(event, "sk_skb", 6) == 0; // a network packet filter for forwarding packets between sockets1
2
3
4
5
6
7
8
9
10
11
12
13
14
15BPF_MAP_TYPE_HASH: a hash table
BPF_MAP_TYPE_ARRAY: an array map, optimized for fast lookup speeds, often used for counters
BPF_MAP_TYPE_PROG_ARRAY: an array of file descriptors corresponding to eBPF programs; used to implement jump tables and sub-programs to handle specific packet protocols
BPF_MAP_TYPE_PERCPU_ARRAY: a per-CPU array, used to implement histograms of latency
BPF_MAP_TYPE_PERF_EVENT_ARRAY: stores pointers to struct perf_event, used to read and store perf event counters
BPF_MAP_TYPE_CGROUP_ARRAY: stores pointers to control groups
BPF_MAP_TYPE_PERCPU_HASH: a per-CPU hash table
BPF_MAP_TYPE_LRU_HASH: a hash table that only retains the most recently used items
BPF_MAP_TYPE_LRU_PERCPU_HASH: a per-CPU hash table that only retains the most recently used items
BPF_MAP_TYPE_LPM_TRIE: a longest-prefix match trie, good for matching IP addresses to a range
BPF_MAP_TYPE_STACK_TRACE: stores stack traces
BPF_MAP_TYPE_ARRAY_OF_MAPS: a map-in-map data structure
BPF_MAP_TYPE_HASH_OF_MAPS: a map-in-map data structure
BPF_MAP_TYPE_DEVICE_MAP: for storing and looking up network device references
BPF_MAP_TYPE_SOCKET_MAP: stores and looks up sockets and allows socket redirection with BPF helper functions
為什麼要用 eBPF
1 | snap install bcc |
1 | /* |
1 | /* |
1 | sudo /usr/share/bcc/tools/trace 't:block:block_rq_complete "sectors=%d", args->nr_sector' -T |
1 | sudo /usr/share/bcc/tools/trace 'r::__kmalloc (retval == 0) "kmalloc failed!"' |
1 | /* |
1 | sudo /usr/share/bcc/tools/funccount t:block:* |
1 | /* |
1 | /* |
First of all, to build a debian package, you have to have a PGP key and upload the key to your launchpad account. You should find other pages describes how to do it, I'm going to go too detail about this. After you have a PGP key and have it setup in your account, here are the setting you need for your environment. For me, I put the settings in .zshenv.
1
2
3export GPGKEY=4D36D0ED
export DEBFULLNAME="Chia-Lin Kao (AceLan)"
export DEBEMAIL="acelan.kao@canonical.com" %}
Create your own PPA on launchpad.
1
https://launchpad.net/~acelankao/+archive/ubuntu/ubuntu-xenial
Get the source code by git
1
git clone git://kernel.ubuntu.com/ubuntu/ubuntu-xenial
Before jumping into ubuntu-xenial directory, I would like you to download the kernel origin tarball which can help you to not upload the whole kernel source tarball every time dput the package to launchpad. You can find the orig tarball link from here.
1
https://packages.ubuntu.com/xenial/linux-source-4.4.0
1
wget http://archive.ubuntu.com/ubuntu/pool/main/l/linux/linux_4.4.0.orig.tar.gz
Enter the ubuntu-xenial directory and apply the patches you want.
1
https://github.com/zman0900/linux-vfio-aur/blob/master/override_for_missing_acs_capabilities.patch
Update configs if needed
1
fakeroot debian/rules updateconfigs
Get the latest ABI files if it's not included in debian.master/abi/
1
head -n1 debian.master/changelog
1
./debian/scripts/misc/getabis 4.4.0 109.132
Adding your flavour name and version
1
dch -i -c debian.master/changelog
1
2
3
4
5linux (4.4.0-109.132+acs1) xenial; urgency=medium
* ACS override patch
-- Chia-Lin Kao (AceLan) <acelan.kao@canonical.com> Sat, 13 Jan 2018 11:52:57 +0800
Commit the changes in step 6, 7, and 8.
1
2git add debian.master
git ci -sm "UBUNTU: 4.4.0-109.132+acs1"
Update changelog file
1
fakeroot debian/rules clean
Generate diff, dsc, and changes files. It might fail if you've tried building kernels in the directory, so it's better to clean up the ubuntu-xenial directory before you go.
1
2git clean -fd
debuild -S -sa -I -i
We are almost there. Uploading your kernel and see how it goes.
1
2cd ..
dput ppa:acelankao/ubuntu-xenial linux_4.4.0-109.132+acs1_source.changes
If you don't want to build your kernel on PPA, you can build it locally after step 5 and run
1
fakeroot debian/rules do_extras_package=false do_tools=0 no_dumpfile=1 clean binary-generic binary-headers
1
2
3
4
5
6
7
8
9
10
11
12
13
14
15
16
17
18
19
20
21
22
23
24
25
26
27
28
29
30
31
32
33
34
35acelan@acelan ~/workspace/ubuntu-xenial (git)-[master] % git checkout -b Ubuntu-4.4.0-116+acs Ubuntu-4.4.0-116.140
Switched to a new branch 'Ubuntu-4.4.0-116+acs'
acelan@acelan ~/workspace/ubuntu-xenial (git)-[Ubuntu-4.4.0-116+acs] % git am ../0001-Ubuntu_Xenial_4.4.0_31_override_for_missing_acs_capa.patch
Applying: Ubuntu_Xenial_4.4.0_31_override_for_missing_acs_capabilities-kernel.patch
acelan@acelan ~/workspace/ubuntu-xenial (git)-[Ubuntu-4.4.0-116+acs] % ./debian/scripts/misc/getabis 4.4.0 116.140
Fetching generic(armhf)...extracting linux-image...GCC: (Ubuntu/Linaro 5.4.0-6ubuntu1~16.04.9) 5.4.0 20160609...done.
Fetching generic-lpae(armhf)...extracting linux-image...GCC: (Ubuntu/Linaro 5.4.0-6ubuntu1~16.04.9) 5.4.0 20160609...done.
Fetching generic(amd64)...extracting linux-image linux-image-extra...GCC: (Ubuntu 5.4.0-6ubuntu1~16.04.9) 5.4.0 20160609...done.
Fetching lowlatency(amd64)...extracting linux-image...GCC: (Ubuntu 5.4.0-6ubuntu1~16.04.9) 5.4.0 20160609...done.
Fetching generic(i386)...extracting linux-image linux-image-extra...GCC: (Ubuntu 5.4.0-6ubuntu1~16.04.9) 5.4.0 20160609...done.
Fetching lowlatency(i386)...extracting linux-image...GCC: (Ubuntu 5.4.0-6ubuntu1~16.04.9) 5.4.0 20160609...done.
Fetching generic(arm64)...extracting linux-image...GCC: (Ubuntu/Linaro 5.4.0-6ubuntu1~16.04.9) 5.4.0 20160609...done.
Fetching generic(ppc64el)...extracting linux-image linux-image-extra...GCC: (Ubuntu/IBM 5.4.0-6ubuntu1~16.04.9) 5.4.0 20160609...done.
Fetching generic(s390x)...extracting linux-image linux-image-extra...GCC: (Ubuntu 5.4.0-6ubuntu1~16.04.9) 5.4.0 20160609...done.
Fetching powerpc-smp(powerpc)...extracting linux-image...GCC: (Ubuntu 5.4.0-6ubuntu1~16.04.9) 5.4.0 20160609...done.
Fetching powerpc64-smp(powerpc)...extracting linux-image...GCC: (Ubuntu 5.4.0-6ubuntu1~16.04.9) 5.4.0 20160609...done.
Fetching powerpc-e500mc(powerpc)...extracting linux-image...GCC: (Ubuntu 5.4.0-6ubuntu1~16.04.9) 5.4.0 20160609...done.
Fetching powerpc64-emb(powerpc)...extracting linux-image...GCC: (Ubuntu 5.4.0-6ubuntu1~16.04.9) 5.4.0 20160609...done.
...
acelan@acelan ~/workspace/ubuntu-xenial (git)-[Ubuntu-4.4.0-116+acs] % dch -i -c debian.master/changelog
acelan@acelan ~/workspace/ubuntu-xenial (git)-[Ubuntu-4.4.0-116+acs] % git add -u
acelan@acelan ~/workspace/ubuntu-xenial (git)-[Ubuntu-4.4.0-116+acs] % git ci -sm "UBUNTU: 4.4.0-116.140+acs1"
[Ubuntu-4.4.0-116+acs e3648e1] UBUNTU: 4.4.0-116.140+acs1
55 files changed, 1 insertion(+), 1 deletion(-)
delete mode 100644 debian.master/abi/4.4.0-115.139/abiname
create mode 100644 debian.master/abi/4.4.0-116.140/abiname
...
acelan@acelan ~/workspace/ubuntu-xenial (git)-[Ubuntu-4.4.0-116+acs] % fakeroot debian/rules clean
acelan@acelan ~/workspace/ubuntu-xenial (git)-[Ubuntu-4.4.0-116+acs] % debuild -S -sa -I -i
...
First of all, you need a kernel git tree, mine is located in ~/workspace/ubuntu-xenial
1 | git clone git://kernel.ubuntu.com/ubuntu/ubuntu-xenial ~/workspace/ubuntu-xenail |
Then, you need to install the kernel debug symbol package which matches the version you want to debug to. In this case, its 4.4.0-81
1 | echo "deb http://ddebs.ubuntu.com $(lsb_release -cs) main restricted universe multiverse |
1 | sudo apt-key adv --keyserver keyserver.ubuntu.com --recv-keys 428D7C01 C8CAB6595FDFF622 |
1 | sudo apt-get update |
Here is our Kernel Oops
1
2
3
4
5
6
7
8
9
10
11
12
13
14
15
16
17
18
19
20
21
22
23
24
25
26
27
28
29
30
31
32
33
34
35
36
37
38
39
40
41
42
43
44
45
46
47
48
49
50
51
52
53
54[ 553.073158] BUG: unable to handle kernel NULL pointer dereference at (null)
[ 553.073179] IP: [<ffffffff8151f14d>] serial8250_do_startup+0x12d/0x650
[ 553.073195] PGD 0
[ 553.073200] Oops: 0000 [#1] SMP
[ 553.073208] Modules linked in: dell_uart_backlight(OE+) rfcomm drbg ansi_cprng ctr ccm nvram msr cmac bnep uvcvideo videobuf2_vmalloc videobuf2_memops videobuf2_v4l2 videobuf2_core v4l2_common videodev media arc4 btusb(OE) btrtl(OE) iwlmvm(OE) mac80211(OE) i2c_designware_platform i2c_designware_core intel_rapl x86_pkg_temp_thermal intel_powerclamp coretemp iwlwifi(OE) kvm_intel kvm dell_wmi_aio dell_wmi sparse_keymap cfg80211(OE) snd_hda_codec_hdmi(OE) snd_hda_codec_realtek(OE) snd_hda_codec_generic(OE) irqbypass hci_uart(OE) btqca(OE) btbcm(OE) snd_hda_intel(OE) snd_hda_codec(OE) btintel(OE) compat(OE) snd_hda_core(OE) rtsx_pci_ms memstick bluetooth snd_hwdep snd_pcm crct10dif_pclmul crc32_pclmul ghash_clmulni_intel snd_seq_midi snd_seq_midi_event aesni_intel aes_x86_64 lrw gf128mul glue_helper
[ 553.073380] snd_rawmidi ablk_helper snd_seq cryptd snd_seq_device snd_timer snd dcdbas acpi_als shpchp serio_raw soundcore idma64 virt_dma kfifo_buf industrialio intel_lpss_acpi 8250_fintek intel_lpss_pci intel_lpss mac_hid acpi_pad parport_pc ppdev lp parport autofs4 btrfs xor raid6_pq hid_generic usbhid rtsx_pci_sdmmc i915_bpo intel_ips i2c_algo_bit psmouse drm_kms_helper e1000e(OE) ptp syscopyarea pps_core sysfillrect sysimgblt rtsx_pci fb_sys_fops drm ahci libahci wmi video i2c_hid hid fjes [last unloaded: dell_uart_backlight]
[ 553.073504] CPU: 3 PID: 5031 Comm: insmod Tainted: G OE 4.4.0-81-generic #104-Ubuntu
[ 553.073521] Hardware name: Dell Inc. Unidentified System/ , BIOS 99.8.3[BCL_HID_DELL0501] 06/21/2017
[ 553.073539] task: ffff8800d67c8000 ti: ffff88011744c000 task.ti: ffff88011744c000
[ 553.073553] RIP: 0010:[<ffffffff8151f14d>] [<ffffffff8151f14d>] serial8250_do_startup+0x12d/0x650
[ 553.073571] RSP: 0018:ffff88011744fac0 EFLAGS: 00010246
[ 553.073581] RAX: 0000000000000000 RBX: ffff8800d6fdbc08 RCX: 0000000000000000
[ 553.073594] RDX: 00000000000003f9 RSI: 0000000000000202 RDI: ffff8800d6fdbc08
[ 553.073607] RBP: ffff88011744fae8 R08: 0000000000000003 R09: ffffffff813fb08c
[ 553.073620] R10: ffffea00035e4400 R11: 0000000000000016 R12: 0000000000000000
[ 553.073633] R13: 0000000000000202 R14: 0000000000000000 R15: ffff8800d5993660
[ 553.073647] FS: 00007fb335f61700(0000) GS:ffff88011dd80000(0000) knlGS:0000000000000000
[ 553.073662] CS: 0010 DS: 0000 ES: 0000 CR0: 0000000080050033
[ 553.073673] CR2: 0000000000000000 CR3: 000000011833e000 CR4: 00000000003406e0
[ 553.073702] DR0: 0000000000000000 DR1: 0000000000000000 DR2: 0000000000000000
[ 553.073723] DR3: 0000000000000000 DR6: 00000000fffe0ff0 DR7: 0000000000000400
[ 553.073736] Stack:
[ 553.073740] ffff8800d6fdbc00 ffff8800d6fdbc08 ffff8800c35b3000 0000000000000029
[ 553.073758] ffff8800d5993660 ffff88011744faf8 ffffffff8151f68b ffff88011744fb48
[ 553.073774] ffffffffc0a2a7a3 ffffffff81290960 ffff8800c35b3268 ffff8800c35b3278
[ 553.073790] Call Trace:
[ 553.073797] [<ffffffff8151f68b>] serial8250_startup+0x1b/0x20
[ 553.073812] [<ffffffffc0a2a7a3>] dell_uart_bl_add+0xb3/0x333 [dell_uart_backlight]
[ 553.073828] [<ffffffff81290960>] ? sysfs_do_create_link_sd.isra.2+0x70/0xb0
[ 553.073843] [<ffffffff81491319>] acpi_device_probe+0x49/0x100
[ 553.073856] [<ffffffff81562ee2>] driver_probe_device+0x222/0x4a0
[ 553.073868] [<ffffffff815631e4>] __driver_attach+0x84/0x90
[ 553.073880] [<ffffffff81563160>] ? driver_probe_device+0x4a0/0x4a0
[ 553.073892] [<ffffffff81560b0c>] bus_for_each_dev+0x6c/0xc0
[ 553.073904] [<ffffffff8156269e>] driver_attach+0x1e/0x20
[ 553.073915] [<ffffffff815621db>] bus_add_driver+0x1eb/0x280
[ 553.073926] [<ffffffffc0008000>] ? 0xffffffffc0008000
[ 553.073937] [<ffffffff81563af0>] driver_register+0x60/0xe0
[ 553.073948] [<ffffffff8149126c>] acpi_bus_register_driver+0x3c/0x50
[ 553.073961] [<ffffffffc0008010>] dell_uart_bl_init+0x10/0x1000 [dell_uart_backlight]
[ 553.073977] [<ffffffff81002123>] do_one_initcall+0xb3/0x200
[ 553.073990] [<ffffffff811ed723>] ? kmem_cache_alloc_trace+0x183/0x1f0
[ 553.074006] [<ffffffff8118dd23>] do_init_module+0x5f/0x1cf
[ 553.074018] [<ffffffff8110aaaf>] load_module+0x166f/0x1c10
[ 553.074029] [<ffffffff81107050>] ? __symbol_put+0x60/0x60
[ 553.074041] [<ffffffff812153b0>] ? kernel_read+0x50/0x80
[ 553.074052] [<ffffffff8110b294>] SYSC_finit_module+0xb4/0xe0
[ 553.074064] [<ffffffff8110b2de>] SyS_finit_module+0xe/0x10
[ 553.074076] [<ffffffff81840a72>] entry_SYSCALL_64_fastpath+0x16/0x71
[ 553.074088] Code: 00 00 40 0f 84 d2 00 00 00 83 bb fc 00 00 00 0c 0f 84 b7 03 00 00 8b 4b 78 85 c9 0f 85 ed 01 00 00 48 8b 83 f8 01 00 00 48 89 df <ff> 10 85 c0 41 89 c4 0f 84 df 00 00 00 66 83 bb d0 01 00 00 00
[ 553.074166] RIP [<ffffffff8151f14d>] serial8250_do_startup+0x12d/0x650
[ 553.074180] RSP <ffff88011744fac0>
[ 553.074187] CR2: 0000000000000000
[ 553.078892] ---[ end trace 3d07b7615015991a ]---
Before starting to look deeper into the log, I would like to setup gdb environment
1
2
3gdb /usr/lib/debug/boot/vmlinux-4.4.0-81-generic
or
gdb /usr/lib/debug/boot/vmlinux-`uname -r`1
2gdb$ list printk
1887 /build/linux-cs3yMe/linux-4.4.0/kernel/printk/printk.c: No such file or directory.1
gdb$ set substitute-path /build/linux-cs3yMe/linux-4.4.0 /home/acelan/workspace/ubuntu-xenial
1
2
3
4
5
6
7
8
9
10
11gdb$ list printk
1887 * printf(3)
1888 *
1889 * See the vsnprintf() documentation for format string extensions over C99.
1890 */
1891 asmlinkage __visible int printk(const char *fmt, ...)
1892 {
1893 printk_func_t vprintk_func;
1894 va_list args;
1895 int r;
1896
We can check what went wrong in the function serial8250_do_startup
1
IP: [<ffffffff8151f14d>] serial8250_do_startup+0x12d/0x650
1
2
3
4
5
6
7
8
9
10
11
12gdb$ list *(serial8250_do_startup+0x12d)
0xffffffff8151f14d is in serial8250_do_startup (/build/linux-cs3yMe/linux-4.4.0/drivers/tty/serial/8250/8250_port.c:1942).
1937 up->port.flags & UPF_BUG_THRE) {
1938 up->bugs |= UART_BUG_THRE;
1939 }
1940 }
1941
1942 retval = up->ops->setup_irq(up);
1943 if (retval)
1944 goto out;
1945
1946 /*
Reference
]]>新的電腦配置如下
現在要設定 VGA Passthrough 簡直簡單到不行 不過還是簡單記錄一下撞到的牆
使用 virt-manager 建立新 vm 時 得要記得選成 UEFI 不要用 BIOS (不需要選 Q35 直接用預設的 I440 就可以了)
我有原版的 Windows 10 專業版 裡面附的是一隻安裝 USB 我用這個 USB dd 出來的 image 在安裝時會一直要我裝驅動程式 明明 virtio driver 都已經掛上 也都裝完了 但是卻一直沒辦法進行下一步 把所有的磁碟都改成 IDE 也一樣 最後就去 MS 官網下載 win10 iso 這樣才順利安裝
安裝時的磁碟機原本選 virtio 安裝時也裝了 virtio driver 但是安裝完重開時 卻會找不到硬碟 沒辦法開機 得要改成 IDE 開 然後再裝一次 virtio 的驅動程式
Windows 整個裝完後 再從 virt-manager 那邊將顯卡跟音效卡從 PCI 那邊選進來 原本的 QXL 顯卡可以先留著 繼續用 virt-manager 裝顯卡 但是最後要開始使用時 記得將 QXL 移調 預設會用這張卡 沒辦法 disable 掉
其他的設定 大概就這些
不知道為什麼 之前泛用的 id 設定不會讓顯卡上的音效裝置載入 vfio-pci 所以我就寫死了
1
options vfio-pci ids=1002:67df,1002:aaf0
開機的 kernel command line 大部分都拿掉了 不過多了個 video=efifb:off 一但啟動 vm dmesg 會吐一大堆錯誤訊息(我沒記錄下來是什麼 :p) 得要加上這個參數才行
1
BOOT_IMAGE=/ROOT/ubuntu@/boot/vmlinuz-4.4.0-64-generic root=ZFS=rpool/ROOT/ubuntu ro quiet splash intel_iommu=on i915.enable_hd_vgaarb=1 kvm.ignore_msrs=1 video=efifb:off vt.handoff=7
Host blacklist radeon
1
sudo sh -c "echo \"blacklist radeon\"" >> /etc/modprobe.d/blacklist.conf
另外我有從舊 server 上抓了些設定檔過來 不是很確定是不是需要
1
2
3
4
5
6
7
8
9
10
11
12
13
14
15
16nvram = [
"/var/vm/ovmf-x64/OVMF_CODE-pure-efi.fd:/var/vm/ovmf-x64/OVMF_VARS-pure-efi.fd",
"/usr/share/OVMF/OVMF_CODE.fd:/usr/share/OVMF/OVMF_VARS.fd",
"/usr/share/AAVMF/AAVMF_CODE.fd:/usr/share/AAVMF/AAVMF_VARS.fd"
]
user = "root"
group = "root"
cgroup_device_acl = [
"/dev/null", "/dev/full", "/dev/zero",
"/dev/random", "/dev/urandom",
"/dev/ptmx", "/dev/kvm", "/dev/kqemu",
"/dev/rtc","/dev/hpet", "/dev/vfio/vfio",
"/dev/vfio/1"
]
clear_emulator_capabilities = 0
最後 vm 的 xml 長這樣
1
2
3
4
5
6
7
8
9
10
11
12
13
14
15
16
17
18
19
20
21
22
23
24
25
26
27
28
29
30
31
32
33
34
35
36
37
38
39
40
41
42
43
44
45
46
47
48
49
50
51
52
53
54
55
56
57
58
59
60
61
62
63
64
65
66
67
68
69
70
71
72
73
74
75
76
77
78
79
80
81
82
83
84
85
86
87
88
89
90
91
92
93
94
95
96
97
98
99
100
101
102
103
104
105
106
107
108
109
110
111
112
113
114
115
116
117
118
119
120
121
122
123
124<domain type='kvm' id='53'>
<name>win10</name>
<uuid>1ac4335d-e696-442a-bf9b-c75c455377e8</uuid>
<memory unit='KiB'>8388608</memory>
<currentMemory unit='KiB'>8388608</currentMemory>
<vcpu placement='static'>8</vcpu>
<resource>
<partition>/machine</partition>
</resource>
<os>
<type arch='x86_64' machine='pc-i440fx-xenial'>hvm</type>
<loader readonly='yes' type='pflash'>/usr/share/OVMF/OVMF_CODE.fd</loader>
<nvram>/var/lib/libvirt/qemu/nvram/win10_VARS.fd</nvram>
</os>
<features>
<acpi/>
<apic/>
<hyperv>
<relaxed state='on'/>
<vapic state='on'/>
<spinlocks state='on' retries='8191'/>
</hyperv>
</features>
<cpu mode='host-passthrough'>
<topology sockets='1' cores='4' threads='2'/>
</cpu>
<clock offset='localtime'>
<timer name='hypervclock' present='yes'/>
</clock>
<on_poweroff>destroy</on_poweroff>
<on_reboot>restart</on_reboot>
<on_crash>restart</on_crash>
<pm>
<suspend-to-mem enabled='no'/>
<suspend-to-disk enabled='no'/>
</pm>
<devices>
<emulator>/usr/bin/qemu-system-x86_64</emulator>
<disk type='file' device='disk'>
<driver name='qemu' type='raw' cache='writeback'/>
<source file='/var/vm/win10.img'/>
<backingStore/>
<target dev='vda' bus='virtio'/>
<boot order='2'/>
<alias name='virtio-disk0'/>
<address type='pci' domain='0x0000' bus='0x00' slot='0x05' function='0x0'/>
</disk>
<disk type='file' device='cdrom'>
<driver name='qemu' type='raw'/>
<source file='/var/vm/iso/virtio-win-0.1.132.iso'/>
<backingStore/>
<target dev='hdc' bus='ide'/>
<readonly/>
<alias name='ide0-1-0'/>
<address type='drive' controller='0' bus='1' target='0' unit='0'/>
</disk>
<controller type='usb' index='0' model='ich9-ehci1'>
<alias name='usb'/>
<address type='pci' domain='0x0000' bus='0x00' slot='0x06' function='0x7'/>
</controller>
<controller type='usb' index='0' model='ich9-uhci1'>
<alias name='usb'/>
<master startport='0'/>
<address type='pci' domain='0x0000' bus='0x00' slot='0x06' function='0x0' multifunction='on'/>
</controller>
<controller type='usb' index='0' model='ich9-uhci2'>
<alias name='usb'/>
<master startport='2'/>
<address type='pci' domain='0x0000' bus='0x00' slot='0x06' function='0x1'/>
</controller>
<controller type='usb' index='0' model='ich9-uhci3'>
<alias name='usb'/>
<master startport='4'/>
<address type='pci' domain='0x0000' bus='0x00' slot='0x06' function='0x2'/>
</controller>
<controller type='pci' index='0' model='pci-root'>
<alias name='pci.0'/>
</controller>
<controller type='ide' index='0'>
<alias name='ide'/>
<address type='pci' domain='0x0000' bus='0x00' slot='0x01' function='0x1'/>
</controller>
<controller type='scsi' index='0' model='virtio-scsi'>
<alias name='scsi0'/>
<address type='pci' domain='0x0000' bus='0x00' slot='0x04' function='0x0'/>
</controller>
<interface type='direct'>
<mac address='52:54:00:92:0a:af'/>
<source dev='enp0s31f6' mode='bridge'/>
<target dev='macvtap0'/>
<model type='virtio'/>
<alias name='net0'/>
<address type='pci' domain='0x0000' bus='0x00' slot='0x03' function='0x0'/>
</interface>
<sound model='ich6'>
<alias name='sound0'/>
<address type='pci' domain='0x0000' bus='0x00' slot='0x0a' function='0x0'/>
</sound>
<hostdev mode='subsystem' type='pci' managed='yes'>
<driver name='vfio'/>
<source>
<address domain='0x0000' bus='0x01' slot='0x00' function='0x0'/>
</source>
<alias name='hostdev0'/>
<address type='pci' domain='0x0000' bus='0x00' slot='0x07' function='0x0'/>
</hostdev>
<hostdev mode='subsystem' type='pci' managed='yes'>
<driver name='vfio'/>
<source>
<address domain='0x0000' bus='0x01' slot='0x00' function='0x1'/>
</source>
<alias name='hostdev1'/>
<address type='pci' domain='0x0000' bus='0x00' slot='0x09' function='0x0'/>
</hostdev>
<memballoon model='virtio'>
<alias name='balloon0'/>
<address type='pci' domain='0x0000' bus='0x00' slot='0x08' function='0x0'/>
</memballoon>
</devices>
<seclabel type='dynamic' model='apparmor' relabel='yes'>
<label>libvirt-1ac4335d-e696-442a-bf9b-c75c455377e8</label>
<imagelabel>libvirt-1ac4335d-e696-442a-bf9b-c75c455377e8</imagelabel>
</seclabel>
</domain>
幾個步驟可以驗證一下
lspci -nnk 看一下顯卡使用的 driver 是不是 vfio-pci
1
Kernel driver in use: vfio-pci
用 top 看一下 CPU loading 發生問題時 不是 100% 不然就是 0.x%
最後是我用 Performance Test 跑的測試結果 我抓了幾台同樣用 RX 480 的 i7 機器來比較 這效能真是剛剛的 沒話說
參考文件
]]>新的電腦配置如下
1 | docker run -it -v /home:/home ubuntu:16.04 |
以下指令沒特別說明的話 都在 docker 裡面執行
1
2
3
4
5
6apt update
apt install software-properties-common
add-apt-repository ppa:wine/wine-builds
dpkg --add-architecture i386
apt update
apt install --install-recommends wine-staging
建立帳號 steam 帳號 因為有 -v /home:/home 所以這個 steam 帳號會出現在 host 的 /home 下
1
2adduser steam
su steam
安裝 x86 版的 steamcmd 我是直接放在 home 目錄下 解開後會有不少檔案
1
2
3
4cd ~
apt install wget unzip
wget https://steamcdn-a.akamaihd.net/client/installer/steamcmd.zip
unzip steamcmd.zip
使用 steamcmd 下載遊戲 約有 13GB
1
/opt/wine-staging/bin/wine steamcmd +login anonymous +force_install_dir c:\\conanKFC +app_update 443030 +quit
下載完後 可以先啟動 server 讓他把設定檔產生出來
1
/opt/wine-staging/bin/wine ~/.wine/drive_c/conankfc/ConanSandboxServer.exe
設定檔會出現在這裡
1
/home/steam/.wine/drive_c/conankfc/ConanSandbox/Config/
主要的幾個檔案是
如果 server 能正確啟動(會吐出非常多的訊息) 那 docker 的部分跟整個 server 的架設就差不多了
Ctrl+C 結束 server 之後再按 Ctrl+D 離開 docker 離開之前 要把帳號後的 image id 給記下來
1
2steam@f3becc6a2a46:~$ exit
root@f3becc6a2a46:~# exit1
acelan@acelan ~/docker/conan % docker commit -m "initial Conan Exiles server" -a "initial Conan Exiles server" f3becc6a2a46 conan_exiles
之後要啟動 Conan Exiles server 需要執行下面指令 基本上這個指令只需要執行一次 以後我們都用 start/stop 來開關這個 server
1
2
3docker run -d --name conan_server -it -v /home:/home \
-p 7777:7777/udp -p 27015:27015/udp \
conan_exiles /opt/wine-staging/bin/wine /home/steam/.wine/drive_c/conankfc/ConanSandboxServer.exe
要停掉 server 這樣做
1
docker stop conan_server
啟動 server 這樣做
1
docker start conan_server
當 Conan Exiles 有更新時 我們得要進入 docker 中來 update 檔案
1
2
3docker exec -i -t conan_server /bin/bash
su steam ; cd
/opt/wine-staging/bin/wine ./steamcmd.exe +login anonymous +force_install_dir c:\\conanKFC +app_update 443030 +quit
想要看 server logs 的 可以用這個指令 不過其實沒什麼好看的 都看不懂就是了
1
docker logs conan_server
昨天試用 Ubuntu Kernel 4.4.0-22 發現 Kernel 的問題已經修好了喔 直接使用就可以了 不需要上額外的 patch
目前遊戲機是用 iMac 因為系統關係 所以常玩的遊戲也都是找有 Mac 版的才玩 唯一會裝 PlayOnMac/PlayOnLinux 來跑的遊戲只有三國志系列(超愛) 不過用 wine 玩實在是不穩 即使有 PlayOnMac 也常常會遇到很多問題 剛好看到這個 VGA Passthrough 所以頭腦一熱 就跑去買了張二手的 AMD/ATI 7970 來試試
我的電腦配置如下
事實上 這是我的 server 我打算在上面跑 Windows VM + VGA Passthrough 然後用 Steam 的 In-Home Streaming 導到我的 iMac 上來玩 一切都想的很美好 直到我發現我買到是一張卡王 (囧
因為這張是卡王 而且我的 server 沒有螢幕(家裡只有一台十幾年前的 15 吋 LCD 最高解析度是 640x480) (用這個螢幕接 Windows 10 沒有畫面 只有一個視窗圖示 orz) 所以為了搞定這個 VGA Passthrough 足足花了我三週的時間 因為沒有螢幕的關係 所以只能靠 virt-manager 來幫忙安裝/管理 VM 下面我就來講講我的心路歷程
不要用 virt-manager 來產生新的 Windows VM 用 virt-manager 產生的 vm machine 是 piix4 但是剛好我們需要的特定裝置(ioh3420) 只支援 q35 所以得要自己寫 xml 來建立 vm
直接在 virsh xml 裡面寫 qemu arg 會發生下面的錯誤 試過所有可能的解法都沒效 所以就只能直接寫在 XML 裡
1
vfio: error opening /dev/vfio/1: Permission denied
需要將 vga 掛在 ioh3420 bus 之下 不然安裝 AMD/ATI driver 時 系統會當機 然後就沒辦法再開機 會一直自動重開
因為 2. 跟 3. 所以必須把 ioh3420 寫在 XML 裡 而 libvirt 對 ioh3420 的支援 一直到 libvirt 1.2.19 才有 [libvirt] [PATCHv3 07/13] qemu: support new pci controller model "pcie-root-port"
Kernel 4.1.6 之後的 VGA Passthrough 支援是壞的 而且一直到 4.4 都還沒修好 (超囧
原本我是直接抓 Ubuntu mainline kernel 來用
v4.1.6-unstable
但是我 docker 需要的 aufs 並沒有進 mainline kernel 所以我就從 aufs 的 git tree clone 了一份 kernel 下來
aufs.sourceforge.net
1
2
3
4
5
6
7
8
9
10sudo apt-get build-dep linux-image-4.2.0-16-generic
git clone git://github.com/sfjro/aufs4-linux.git
cd aufs4-linux
git checkout -b aufs4.1 origin/aufs4.1
wget http://kernel.ubuntu.com/~kernel-ppa/mainline/v4.1.6-unstable/0001-base-packaging.patch
wget http://kernel.ubuntu.com/~kernel-ppa/mainline/v4.1.6-unstable/0002-debian-changelog.patch
wget http://kernel.ubuntu.com/~kernel-ppa/mainline/v4.1.6-unstable/0003-configs-based-on-Ubuntu-4.1.0-3.3.patch
git am 000{1,2,3}*
fakeroot debian/rules clean binary-generic binary-headers # 這邊會問 aufs 要不要開 除了 debug 的之外 我都選 Y
sudo dpkg -i ../linux-headers-4.1.6-040106_4.1.6-040106.201508170230_all.deb ../linux-headers-4.1.6-040106-generic_4.1.6-040106.201508170230_amd64.deb ../linux-image-4.1.6-040106-generic_4.1.6-040106.201508170230_amd64.deb ../linux-image-extra-4.1.6-040106-generic_4.1.6-040106.201508170230_amd64.deb
基本上要注意的就是這些啦 VGA Passthrough 的進展非常快 很多文章都已經沒有用了 像是需要找出顯卡的 vfio group 啦 然後 unbind/bind 一大堆有的沒有的 或是要上 i915 ACS patch 什麼的 也通通不需要了 virt-manager 幫我們把 vfio 那些工作做完了 i915 現在不需要了 ACS 則是可有可無
接下來就是比較正式的操作步驟了
準備好 vm 的磁碟跟 windows 安裝 iso 我把檔案通通放在 /var/vm 底下
1
dd if=/dev/zero of=/var/vm/win10.img bs=1M seek=200000 count=0
1
2cd /var/vm/iso
wget https://fedorapeople.org/groups/virt/virtio-win/direct-downloads/stable-virtio/virtio-win.iso
使用 virt-manager 建立一個 Windows VM 記得將 virtio-win.iso 掛上 然後開始安裝系統 磁碟選擇 raw/scsi virtio 網路選擇 bridge 模式及 virtio 安裝時找不到 driver 就從 virtio-win.iso 裡找 得要給到最終目錄才找的到 driver
裝完 Windows 之後 可以先把會用的遠端登入系統裝一裝(我使用 splashtop 當然直接使用 RDP 也可以)
把 VM 刪掉 保留 win10.img 然後用下面的 XML 重新產生一個 VM
1
rsync -v --sparse --progress /var/vm/win10.img /var/vm/win10.img.orig
1
201:00.0 VGA compatible controller: Advanced Micro Devices, Inc. [AMD/ATI] Tahiti XT [Radeon HD 7970/8970 OEM / R9 280X]
01:00.1 Audio device: Advanced Micro Devices, Inc. [AMD/ATI] Tahiti XT HDMI Audio [Radeon HD 7970 Series]1
2
3
4
5
6
7
8
9
10
11
12
13
14
15
16
17
18
19
20
21
22
23
24
25
26
27
28
29
30
31
32
33
34
35
36
37
38
39
40
41
42
43
44
45
46
47
48
49
50
51
52
53
54
55
56
57
58
59
60
61
62
63
64
65
66
67
68
69
70<?xml version="1.0" encoding="UTF-8"?>
<domain xmlns:qemu="http://libvirt.org/schemas/domain/qemu/1.0" type="kvm">
<name>win10</name>
<memory unit='KiB'>8388608</memory>
<currentMemory unit='KiB'>8388608</currentMemory>
<memoryBacking>
<locked />
</memoryBacking>
<vcpu placement='static' current='4'>8</vcpu>
<os>
<type arch='x86_64' machine='q35'>hvm</type>
<loader type='rom'>OVMF.fd</loader>
<bootmenu enable='yes'/>
</os>
<features>
<acpi/>
<apic/>
<hyperv>
<relaxed state='on'/>
<vapic state='on'/>
<spinlocks state='on' retries='8191'/>
</hyperv>
<kvm>
<hidden state='on'/>
</kvm>
</features>
<cpu mode='host-passthrough'>
<topology sockets='1' cores='4' threads='2'/>
</cpu>
<clock offset='localtime'>
<timer name="hypervclock" present="yes" />
</clock>
<on_poweroff>destroy</on_poweroff>
<on_reboot>restart</on_reboot>
<on_crash>restart</on_crash>
<pm>
<suspend-to-mem enabled='no'/>
<suspend-to-disk enabled='no'/>
</pm>
<devices>
<emulator>/usr/bin/qemu-system-x86_64</emulator>
<sound model='ich6'/>
<controller type='sata' index='0'/>
<controller type='pci' index='0' model='pcie-root'/>
<controller type='pci' index='1' model='dmi-to-pci-bridge'/>
<controller type='pci' index='2' model='pci-bridge'/>
<controller type='pci' index='3' model='pcie-root-port' multifunction='on'/>
<controller type='scsi' index='0' model='virtio-scsi'/>
<disk type='file' device='disk'>
<driver name='qemu' type='raw'/>
<source file='/var/vm/win10.img'/>
<target dev='sda' bus='scsi'/>
<address type='drive' controller='0' bus='0' target='0' unit='0'/>
</disk>
<hostdev mode='subsystem' type='pci' managed='yes'>
<driver name='vfio'/>
<source>
<address domain='0x0000' bus='0x01' slot='0x00' function='0x0'/>
</source>
<address type='pci' domain='0x0000' bus='0x03' slot='0x00' function='0x0' multifunction='on'/>
</hostdev>
<hostdev mode='subsystem' type='pci' managed='yes'>
<driver name='vfio'/>
<source>
<address domain='0x0000' bus='0x01' slot='0x00' function='0x1'/>
</source>
<address type='pci' domain='0x0000' bus='0x03' slot='0x00' function='0x1'/>
</hostdev>
</devices>
</domain>1
virsh define win10.xml
使用 virt-manager 把需要的 device 加上去(重點是 bridge mode 的 network)(另外好像不能加 cdrom 我沒特別去查哪裡有問題)
Host 的 kernel command line 要打開 iommu(其實我加了很多參數 因為之前一直撞牆 所以不是很確定那一大堆是不是都需要 不過我猜前三個是必要的)
1
GRUB_CMDLINE_LINUX_DEFAULT="intel_iommu=on i915.enable_hd_vgaarb=1 kvm.ignore_msrs=1 kvm.allow_unsafe_assigned_interrupts=1 vfio_iommu_type1.allow_unsafe_interrupts=1 kvm_intel.emulate_invalid_guest_state=0 nohz=off nomdmonddf nomdmonisw"
Host blacklist radeon
1
sudo sh -c "echo \"blacklist radeon\"" >> /etc/modprobe.d/blacklist.conf
標記 vfio device (這個適用於所有的 AMD/ATI 及 nVidia 顯卡)
1
options vfio-pci ids=1002:ffffffff:ffffffff:ffffffff:00030000:ffff00ff,1002:ffffffff:ffffffff:ffffffff:00040300:ffffffff,10de:ffffffff:ffffffff:ffffffff:00030000:ffff00ff,10de:ffffffff:ffffffff:ffffffff:00040300:ffffffff
因為使用 uEFI 所以得要裝 ovmf
1
sudo apt-get install ovmf
重開 host machine 然後啟動 vm 然後安裝顯卡 driver 差不多就這樣了
幾個步驟可以驗證一下
lspci -vvnn 看一下顯卡使用的 driver 是不是 vfio-pci
1
Kernel driver in use: vfio-pci
用 top 看一下 CPU loading 發生問題時 不是 100% 不然就是 0.x%
如果 vm 順利執行 可以用 arp -a 從 vm 的 mac 找到他的 ip
最後是我用 Performance Test 跑的測試結果 可以看出 跟一般 native 的 AMD/ATI 7970 並沒有太大差異 輸比較多的就是 CPU 了
參考文件
]]>